

Setting Up Thincast RD Gateway Shield with 2FA on Thinstuff XP/VS Terminal Server
Introduction to Thincast RD Gateway Shield with 2FA
The Thincast RD Gateway Shield with 2FA is a powerful security feature integrated into Thinstuff XP/VS Terminal Server (Professional Version only). It enhances Remote Desktop Protocol (RDP) connections by:
- Encapsulating RDP in HTTPS: This makes connections firewall-friendly, requiring only port 443 (or a custom port) to be open, rather than the standard RDP port 3389.
- Providing Two-Factor Authentication (2FA): Adds an extra layer of security to ensure only authorized users gain access.
- Using Standard RD Gateway Protocol: Ensures compatibility with virtually any RDP client that supports RD Gateway, such as Microsoft’s Remote Desktop Connection (mstsc.exe).
- Simplified Implementation: This is a custom-built, less complex version of Thincast’s RD WebServices, named "RD WebServices XPVS", designed specifically for Thinstuff XP/VS Terminal Server.
Important Limitation: Unlike a full RD Gateway, RD WebServices XPVS only proxies connections to its own local machine (localhost or 127.0.0.1 from the view of the service) where both the XP/VS Terminal Server and the RD Gateway service are running. It cannot connect to any other remote RDP servers.
Requirements:
- Thinstuff XP/VS Terminal Server from version 1.0.970 with a Professional License (64-bit version).
- Basic understanding of RDP, RD Gateway, and SSL certificates.
What is an RD Gateway?
An RD Gateway is a component of Microsoft’s Remote Desktop Services that allows secure access to internal RDP servers from external networks. It acts as a proxy, encrypting RDP traffic within SSL/TLS (HTTPS) to ensure secure communication over the internet without requiring a VPN. For more generic details on RD Gateway, see Microsoft’s documentation on Remote Desktop Gateway RDS role service.
Thincast’s RD Gateway implementation, used in this feature, provides similar functionality but is tailored for integration with XP/VS Terminal Server and includes 2FA support via the Thincast Authenticator app (Android, iOS).
Tutorial: Setting Up and Testing Thincast RD Gateway Shield with 2FA
This tutorial guides you through enabling, configuring, and testing Thincast RD Gateway Shield with 2FA on a single Windows PC running Thinstuff XP/VS Terminal Server. The PC acts as both the RDP server and client, with an IP address of 192.168.50.119 in this example.
Prerequisites
- License: Ensure a Thinstuff XP/VS Professional License is installed.
- Environment: The tutorial uses a single PC for simplicity, hosting both the XP/VS Terminal Server and the RDP client.
- Certificates: SSL certificates are critical for secure connections. For testing, we’ll use a self-signed certificate. In production, obtain a certificate from a trusted Certificate Authority (CA).
Note on Certificates: Certificates verify the identity of the RD Gateway and encrypt the connection. A trusted CA certificate prevents trust warnings on clients. For more information, see e.g. What is an SSL certificate?
Step-by-Step Instructions
Notice: The following steps are simplified for testing the Thincast RD Gateway Shield with 2FA on a single host. In real-life setups, you will need to configure your firewall to allow incoming connections on the specified port (e.g., 443), set up port forwarding if behind a NAT or router, and use a trusted certificate from a Certificate Authority (CA) to ensure secure and trusted connections from external clients. For detailed guidance on production configurations, refer to Thincast’s RD WebServices Documentation.
Step 1: Enable Thincast RD WebServices
- Open the XPVS Administrator application.
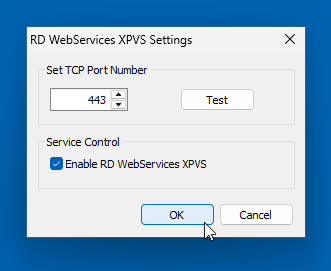
- Navigate to Options > Thincast RD WebServices > Service configuration
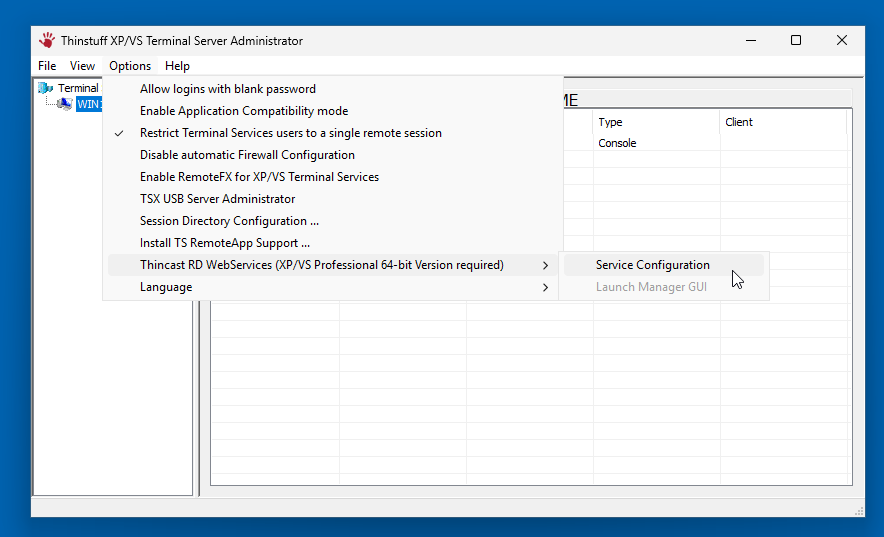
- In the RD WebServices XPVS Settings window, set the port number to 443 (or your preferred port) and check the box to Enable service.
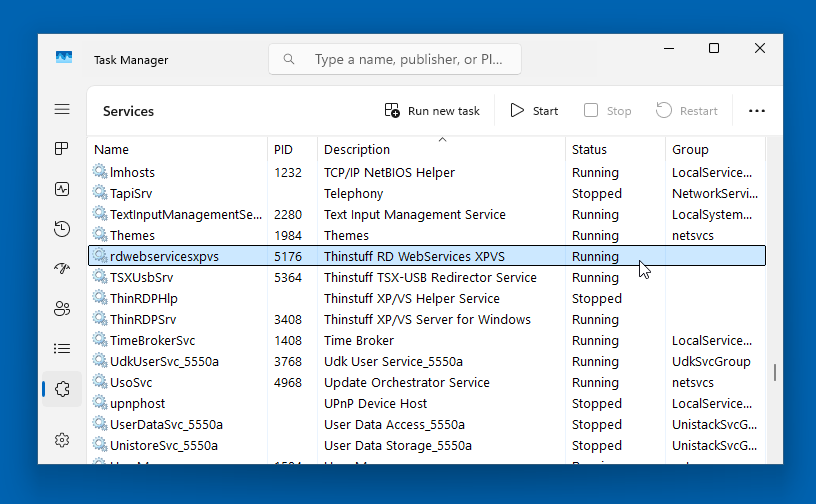
- Verify the service is running:
Open Task Manager and go to the Services tab and look for the service named
rdwebservicesxpvs(description: Thinstuff RD WebServices XPVS) and confirm it is in the Running state.
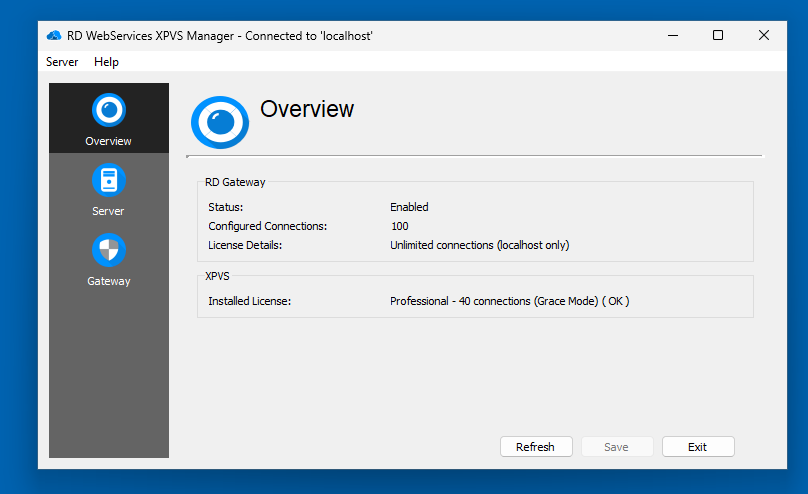
Step 2: Launch the RD WebServices XPVS Manager GUI
- In XPVS Administrator, go to Options > Thincast RD WebServices! > Launch Manager GUI.
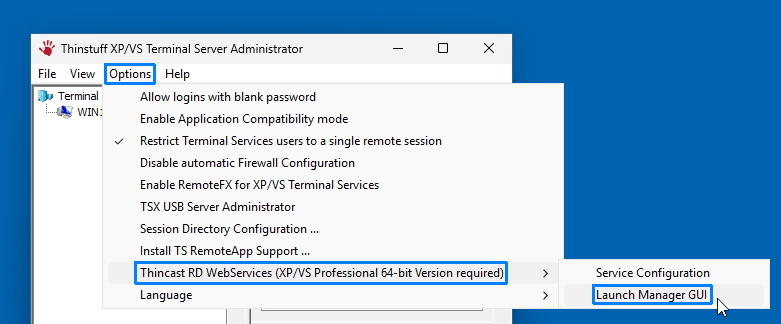
- The Thincast RD WebServices XPVS Manager GUI will open, displaying the start page.
Step 3: Create and Install a Self-Signed Certificate
For this test, we’ll create a self-signed certificate. In production, use a trusted CA certificate.
- In the Manager GUI, select the Server section and go to the Certificate tab.
- Click Create Selfsigned Certificate.
- In the dialog, enter the hostname as the IP address of the host (e.g.,
192.168.50.119).
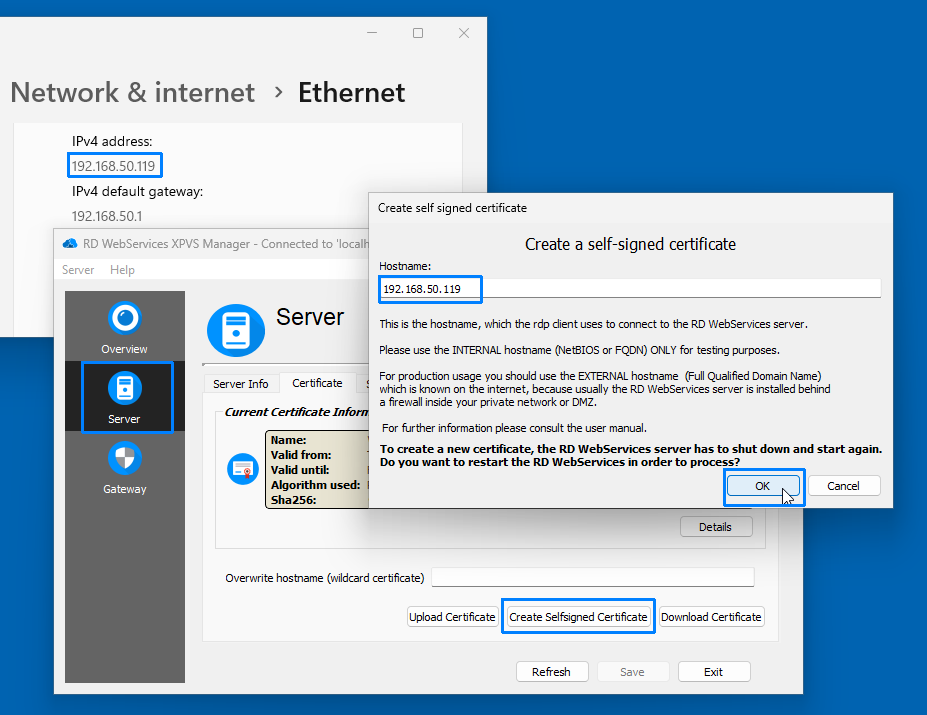
- Click OK to generate the certificate.
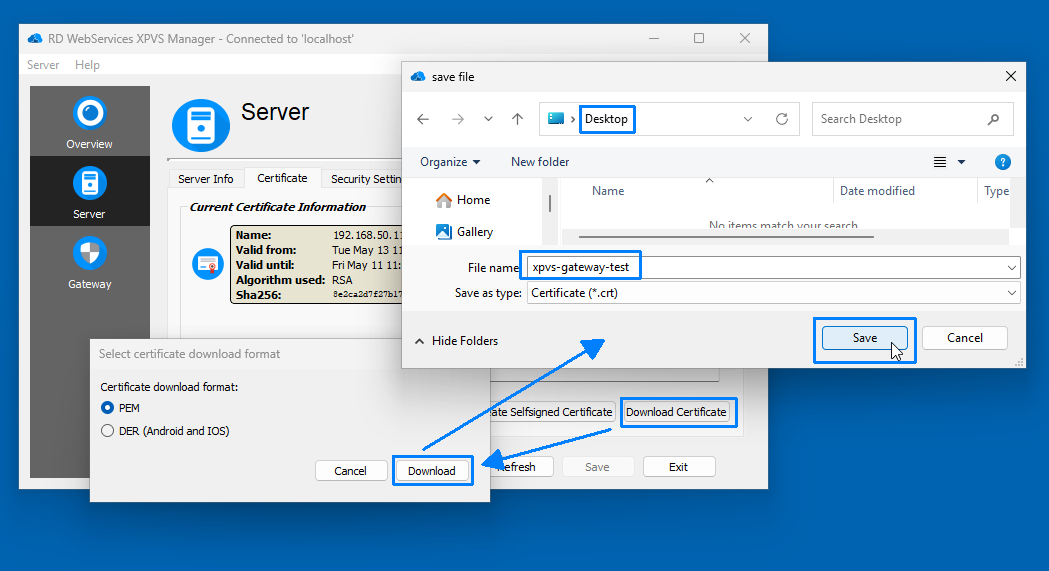
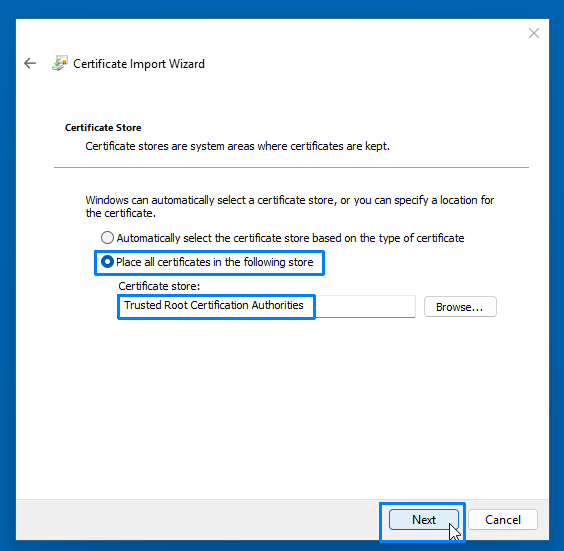
- To trust the certificate on the client:
- Click Download Certificate to save the certificate file to your desktop.
- Right-click the certificate file and select Install certificate.
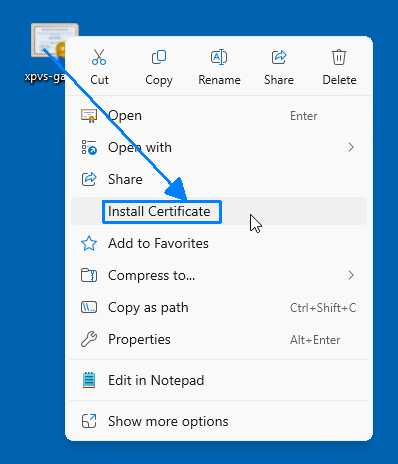
- In the Certificate Import Wizard, choose Trusted Root Certificate Authorities as the store location and complete the import.
- Click Download Certificate to save the certificate file to your desktop.
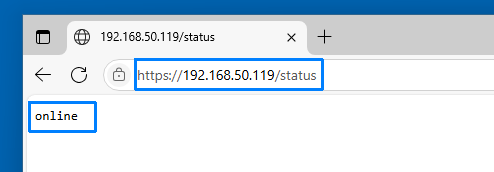
Step 4: Verify RD WebServices Status
- Open a web browser and navigate to
https://192.168.50.119/status. - Confirm the page displays
online, indicating the RD WebServices XPVS service is operational.
Step 5: Configure the RDP Client
- Launch Remote Desktop Connection (mstsc.exe).
- In the General tab, set the Computer field to
127.0.0.1(localhost), as the RD Gateway only proxies to the local machine. You can of course also use the windows computer name or any name that resolves to that XP/VS PC.
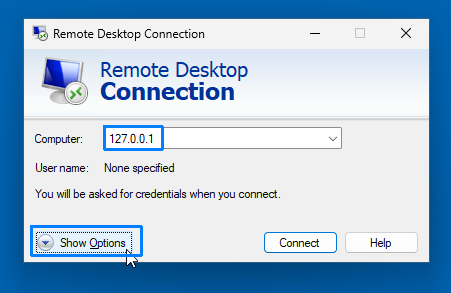
- Click Show Options to expand the mstsc GUI and go to the Advanced tab and click Settings in the Connect from anywhere group.
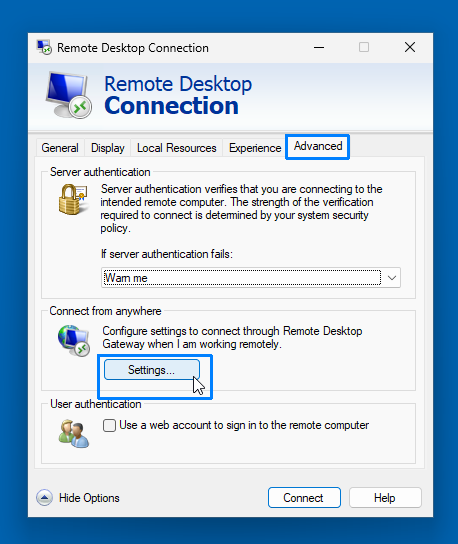
- In the Remote Desktop Connection's RD Gateway Server Settings:
- Select Use these RD Gateway server settings.
- Set Server name to
192.168.50.119(the host’s IP address). - Uncheck Bypass RD Gateway server for local addresses (important for this test).
- Check Use my RD Gateway credentials for the remote computer.
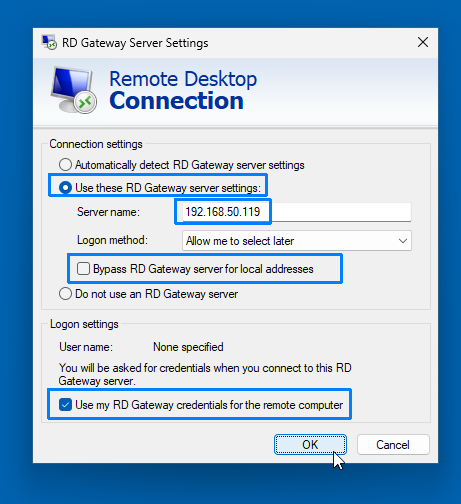
- Click OK and then Connect.
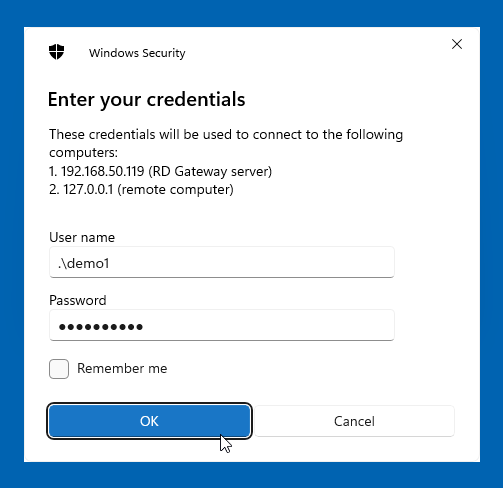
- In the credentials dialog, enter the username in the format
.\username(e.g.,.\demo1) and your password.
Note: The.\prefix indicates a local account, avoiding the need to specify a domain or machine name.
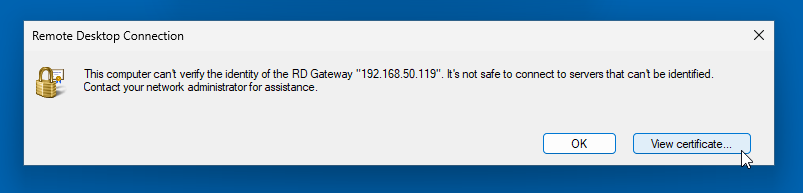
- If the certificate is not trusted, you may hit the following blocker. Ensure the certificate was correctly imported into Trusted Root Certificate Authorities.
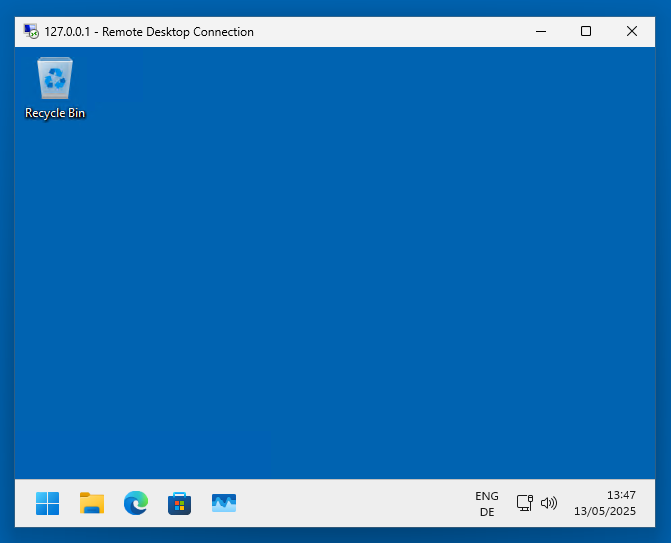
- Upon successful connection, the RDP session window will open.
Step 6: Verify the Connection via RD Gateway
-
In the RD WebServices XPVS Manager GUI, select the Gateway section and go to the Monitoring tab.
-
Confirm an entry exists for the connection, showing the user (e.g.,
XPVS-SRV\demo1) and a successful status. You can also explore the options offered when right-clicking that connection entry now.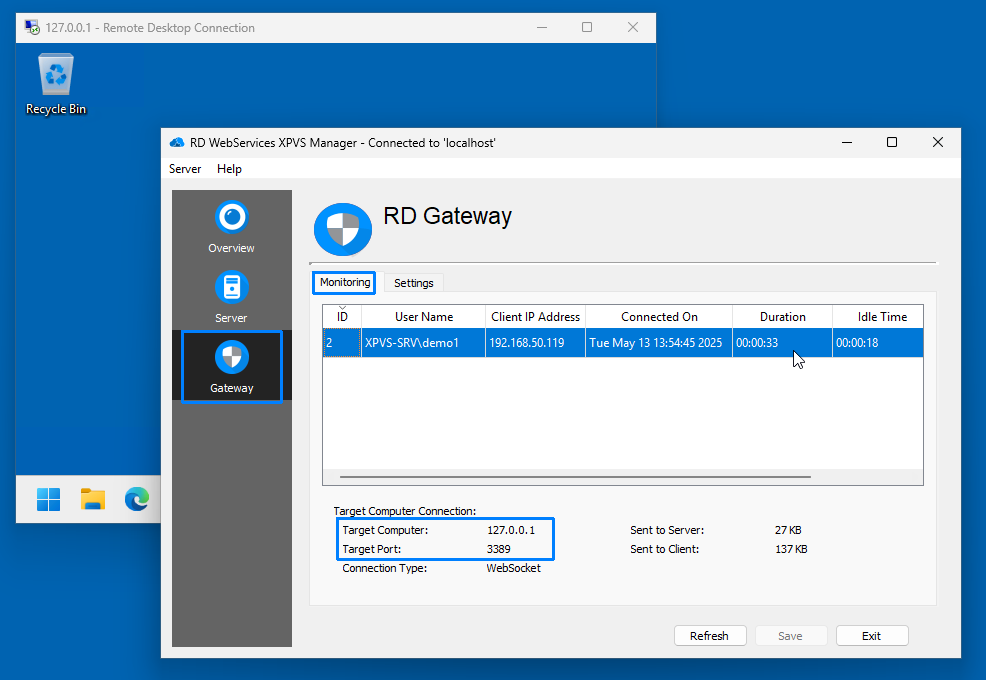
Two-Factor Authentication (2FA) Setup
To enhance the security of your Thincast RD Gateway Shield, you can enable Two-Factor Authentication (2FA) for users. This requires the Thincast Authenticator App, available for Android and iOS, to be installed on the user's mobile device. 2FA adds an extra layer of security by requiring users to confirm their identity through the authenticator app during each RDP connection.
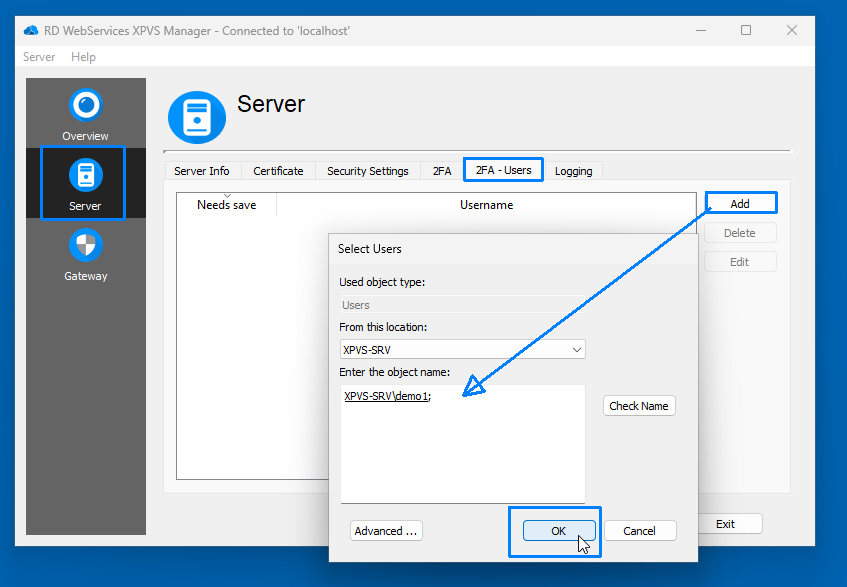
Step 1: Add User for 2FA
- In the Thincast RD WebServices XPVS Manager GUI, navigate to the Server section and select the 2FA - Users tab.
- Click Add to open the user selection dialog.
- Select the users you want to enable 2FA for (e.g., "demo1"), and then press Save in the main dialog.
Step 2: Generate QR Code for Authenticator App
- With the user selected, click Edit to open the user's 2FA information.
- Go to the Tokens tab and click Show QR code.
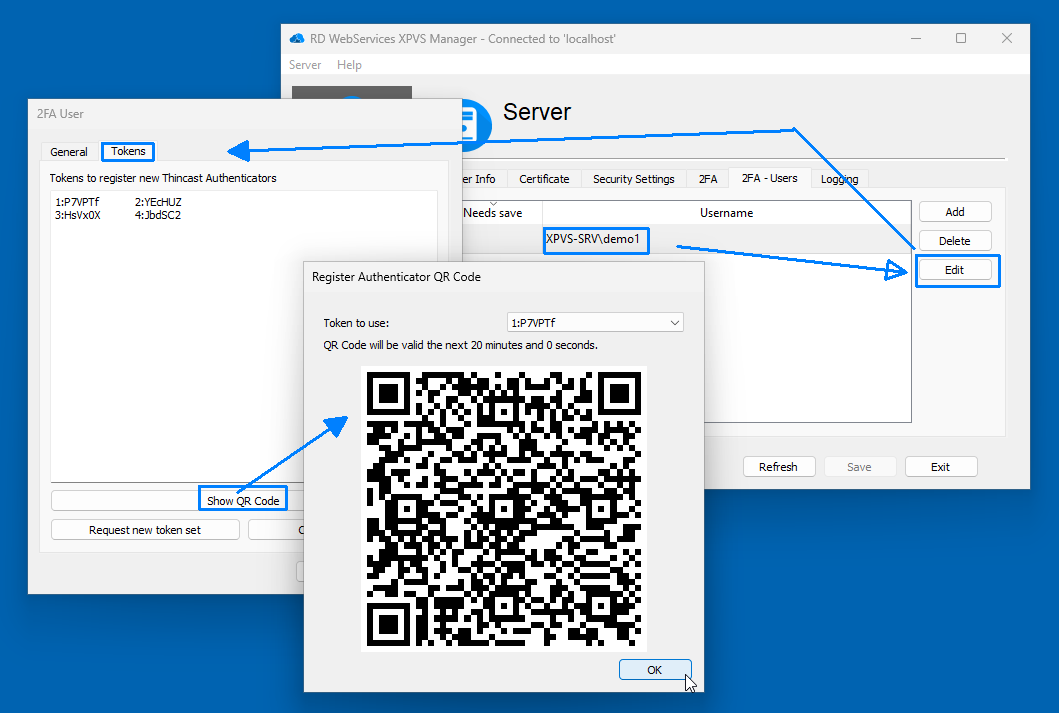
- The QR code is valid for 20 minutes. Users can scan this code with the Thincast Authenticator App to register their device.
Step 3: Register Authenticator App
- On the user's mobile device, open the Thincast Authenticator App.
- Scan the QR code displayed in the Manager GUI.
- Alternatively, users can manually enter the token details provided in the Manager GUI.
Step 4: Test 2FA Connection
- Initiate an RDP connection using the RD Gateway settings as previously configured.
- When the connection is attempted, it will stall until the user approves the connection via the Thincast Authenticator App.
- In the Authenticator App, the user will see a request to allow or deny the connection.

- Upon selecting "Allow," the RD Gateway will proceed to proxy the connection to the local RDP server.
Step 5: Force 2FA for All Users
For maximum security, you can enforce 2FA for all users:
- In the Thincast RD WebServices XPVS Manager GUI, navigate to the Server section and select the 2FA tab.
- Check the box for Force 2FA Authentication (Users without 2FA cannot login).
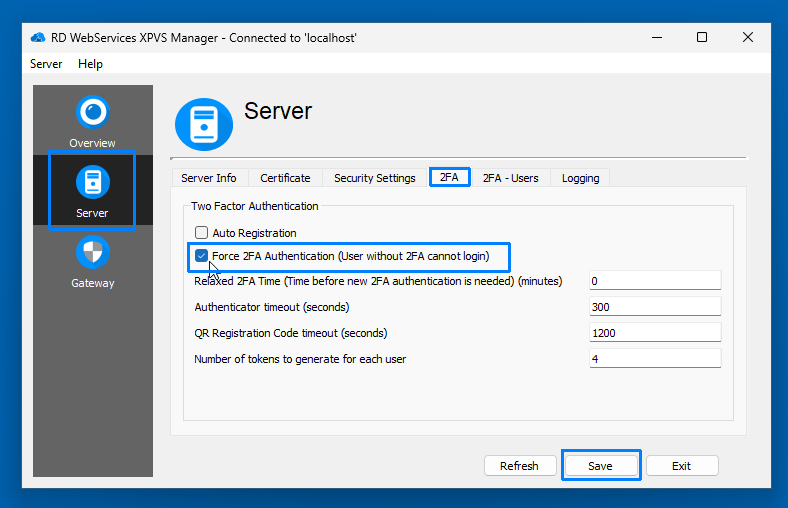
- This ensures that only users with 2FA enabled can connect through the RD Gateway.
Note: For more detailed information on 2FA configuration, including self-registration options, refer to the official Thincast RD WebServices Documentation: Thincast RD WebServices 2FA Documentation.
Additional Notes
- Firewall Configuration: In real-life setups, ensure your firewall allows incoming connections on the configured port (e.g., 443). Port forwarding may also be required if the RD Gateway is behind a NAT or router.
- Certificate Management: For production environments, obtain a trusted certificate from a Certificate Authority (CA) to avoid trust warnings on client devices.
- Troubleshooting: If the connection fails, verify the service status, certificate trust, and RDP client settings (gateway address and localhost as the computer name).